There are plenty of guides on how to host your static content on S3 and CloudFront, so in this tutorial I’ll just focus on some of the likely problems you’ll run into, and some good tips on making things better.
S3
The first thing you’ll have to do to host your static content is create an S3 bucket to upload your content. This is straight forward, but there are three things you must make sure are setup correctly:
Make sure the bucket’s name matches the URL you want to use. For example, for this blog, the bucket’s name is blog.earaya.com.
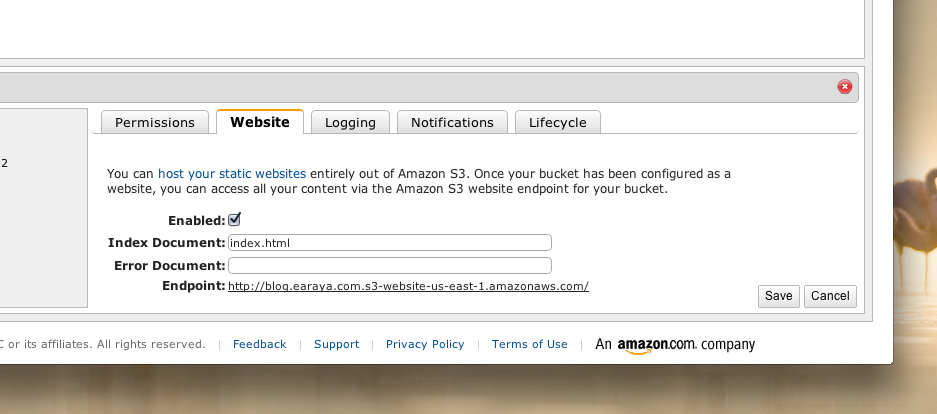
Enable website browsing.
This is done by clicking the “Properties” button for your bucket (up on the right hand corner) and then clicking on the “Website” tab. You’ll then just have to check the “Enabled” checkbox, and choose your Index and Error Documents.

This step allows you to create an HTTP endpoint through which your assets can be accessed. It’s important to note this endpoint as we’ll be using it later to setup CloudFront.
Setup a bucket policy allowing the “GetObject” action to anonymous users. You’ll want to make sure you do this at the bucket level so you don’t have to set ACLs for every new file you upload.
Again, this is done by clicking on the “Properties” button, then on the “Permissions” tab, and then adding the following bucket policy:
1 2 3 4 5 6 7 8 9 10 11 12 13 14 15 | |
It’s important not to miss this step as you’ll get an “AccessDenied” error on your documents if try to browse the website endpoint.
That’s it as far as S3 goes. You’re now ready to setup CloudFront.
CloudFront
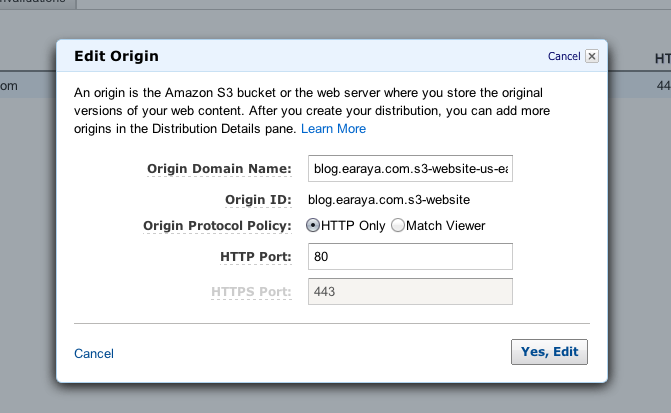
The only thing worth noting here is that while you’re going through the wizard that creates your distribution, you DO NOT want to use your S3 bucket as your “Origin Domain Name”. Rather, you want to use the “Endpoint” URL you got while setting up S3 as described in Step 2 above.

When you’re done with the wizard, note the domain name for your CloudFront distribution. You’ll need it to setup DNS.
DNS (Route 53)

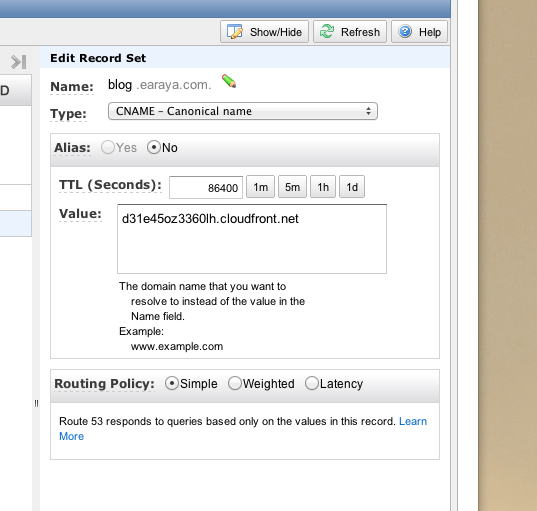
Add a CNAME, and point it to the domain name of your CloudFront distribution. This blog, for example, points “blog.earaya.com” to d31e45oz3360lh.cloudfront.net (which is what I got when I finished setting up my CF distribution as described above).
You don’t necessarily have to setup DNS on AWS; your domain name registrar can likely add a CNAME record and point it to the CloudFront URL as well.
I mostly ended up using Route53 because I felt like trying it out. Your registrar probably has decent DNS service, so you could just use that instead.
Performance Tips
S3, being just a store, won’t compress files for you. If you want to serve compressed content (which you should), you’ll have to jump through quite a few hoops to get that working. Look at the “Serving Compressed Files From Amazon S3” in this guide here.
Also, S3 won’t set any caching headers by default. You’ll have to make sure you set the appropriate headers manually on each file you want cached. The good news is that although setting this up is tedious, CloudFront will respect your caching headers and evict content appropirately.
Summary
Hopefully you’ve gotten a good idea of how to setup your static site on S3 and CloudFront. It’s really not hard to do at all.
Considering, however, that you can get a micro linux instance for free on EC2, I’d say it’s worth exploring using a good web server to serve your content instead of using S3. That way, you could get caching and compression for free.