eSteve's Blog

A blog about code, computers, and stuff.

HMAC User Authentication

@derrickisaacson recently showed me a really slick way to do user authentication with HMACs. Here’s a real quick overview on how to accomplish it:

User Sign In

One of the cool things about using HMACs for authentication is that you can keep your current sign in process. Validate user credentials however you see fit, and then, upon credential validation, hand your user something like the following token:

<userId, timestamp, hmac(userId + timestamp)>

The idea behind this is that once a user has proved his identity, we can hand them the above token as an authentication code that will be able to prove their identity going forward. The client, of course, will have to submit the token on every subsequent request to the server so, if your client is a browser, you may want to consider sending the token down in a cookie.

A note of caution: If an attacker is able to intercept or sniff the token when sent to the client, all bets are off and this, and just about any other authentication scheme, provides no protection. Please make sure you encrypt your client connection when using the ideas describe here.

While you have to worry about safely delivering the token, you don’t have to worry about legitimate users trying to modify the token. This is because even though clients will have access to the token, they can’t recalculate the HMAC of the data handed to them; they don’t have the key that your server used to calculate the hash.

Request Authentication

Now that your client has the necessary token to make authenticated requests, all you have to do is verify the token. This is accomplished by recalculating the HMAC of the token they’ve sent you and comparing it to the one produced on your server for authentication purposes. Here’s some pseudocode to make the point clearer:

1
2
3
4
HmacToken clientToken = HmacToken.parse(stringWithTokenFromClient);
HmacToken serverToken = HmacTokenGenerator.generateToken(clientToken.getUserId(), clientToken.getTimestamp());

return clientToken.getSignature() == serverToken.getSignature();

You can adjust the above code to also validate the timestamp and reject the token if it’s too old (and require the user to sign in again), but you get the point.

One of the best things of using this idea for authentication is that you can now validate requests without keeping any sort of state: every request contains all the information you need to validate it. No need to keep any sort of session tokens around, and no need to do any kind of lookups; you’re completely stateless. Pretty awesome, huh?

Some Recommendations

Don’t write your own cryptography code. Use a well known (preferably open source) library to calculate your HMACs. It’s hard to get cryptography right, so this is an area were relying on the experience of experts is well worth it.

Also, make sure you have an effective key management and rotation strategy. If your HMAC key is compromised, you’re toast: people will be able to create tokens illegitimately. I’d recommend you generate a new random key every time you deploy so that no one has knowledge of it and it is changed often. If you can’t do that, at least make sure the key is never checked in anywhere in code and just very few individuals have access to it.

I really like this authentication scheme: the HMAC key is never sent to the client, so there’s no key sharing and negotiation to get wrong. Furthermore, with very few changes to any authentication process, you can get a stateless, distributed authentication mechanism that is simple to write and easy to understand.

Give this a try and let me know what you think. Or if you see any big gaping holes, please let me know.
Using Char Arrays for Passwords

Just a few days ago a co-worker asked me about mongodb’s choice of char[] for the password in their authenticate call. He was wondering why they chose char[] over String.

The reason is simple: some people feel that using a char[] is safer since you can “wipe out” the array after you’re done with the data (eg. the password). String being an immutable type does not allow this precaution; once you’re done with the String it’ll live in memory until garbage collection decides to claim it at an undetermined time in the future.

The implication, of course, is that an attacker may read the contents of the memory before the String is garbage collected and steal the password.

This, however, seems a moot to me. Switching to a char[] does not really solve the problem; it only reduces the time window in which the memory contents are available to an attacker. This is even worse than security through obscurity; really, this is just giving up and pretending to do something to address the problem. I’ll also say that if someone is able to read the contents of your memory space, you have bigger problems than using a String for your password.

Nonetheless, there is one slight advantage in using character arrays for sensitive data: you’re less likely to accidentally print the contents of an Array (to a log, or console, etc.) than the contents of a String.

1
2
char[] secret = "Secret".toCharArray();
System.out.println("Value: " + secret);

The above code, for example, does not print “Secret”. Rather, it prints the @ character followed by the unsigned hexadecimal representation of the hash code of the object. This is because Array does not override Object’s implementation of toString, so you just get the default behavior (see documentation). Still, I don’t think this is enough “security” to warrant using a character array.

The real solution, would be to implement something like .NET’s SecureString. A SecureString object behaves a lot like a regular String object except that its memory contents are automatically encrypted. Furthermore, a SecureString instance is immediately discarded when no longer in use. This approach offers real security and it gives developers are more appropriate API when handling strings.

If it wasn’t for the fact that it sucks to handle strings as character arrays, I’d say that the marginal security benefits of using a char[] are worth it. But really, there’s no way to rationally justify this. Just keep using a String, or if you really care, find a good SecureString implementation.

Octopress Review

Now that I’ve been using Octopress for a few weeks, I thought I’d just share some of my initial thoughts on it.

It Rocks!

  1. You can have your blog up and running in under 10 minutes. Furthermore, if you use GitHub pages to host your blog, you get a deployment process out of the box with very little effort.

  2. The HTML template that Brandon Mathis has setup is fantastic. My favorite part about the template is how responsive it is, and how well it works in mobile devices. Go ahead, give this site a try on your phone; the template works really well there.

  3. The product really makes it a joy for hackers to blog. I’ve never had so much fun setting up my blog and writing posts.

Yet

Howerver, there are a few things I wish were a bit different.

  1. On version 2.0, it seems like JS is a second class citizen. Scripts are not compiled, minified, and stitched into a single file.

    I know there’s an effort to change in this in version 2.1, but I disagree with the direction Brandon has taken. He really should be using RequireJS.

  2. I wish there was tighter integration with S3. There have been several pull requests to add this feature, but they have yet to be merged.

    It’d be nice, for example, to get a deployment process that also uploads gzipped files (sets the headers on S3 for them) and also sets reasonable cache headers for different file types.

    Little side note here: s3cmd is awesome. The sync command will compare the files you’re trying to upload and only upload changes. Can’t recommend it enough.

  3. A matter of preference, but I wish Mustache or Handlebars was the templating language. Now, to be fair, I think this is a Jekyll dependency, so it’s not really an issue with Octopress directly.

The Veredict

If you love tinkering, Octopress is for you. You’ll have an awesome blog quickly and you’ll enjoy tweaking it to your heart’s content.

Hosting a Static Website on Amazon S3 & CloudFront

There are plenty of guides on how to host your static content on S3 and CloudFront, so in this tutorial I’ll just focus on some of the likely problems you’ll run into, and some good tips on making things better.

S3

The first thing you’ll have to do to host your static content is create an S3 bucket to upload your content. This is straight forward, but there are three things you must make sure are setup correctly:

  1. Make sure the bucket’s name matches the URL you want to use. For example, for this blog, the bucket’s name is blog.earaya.com.

  2. Enable website browsing.

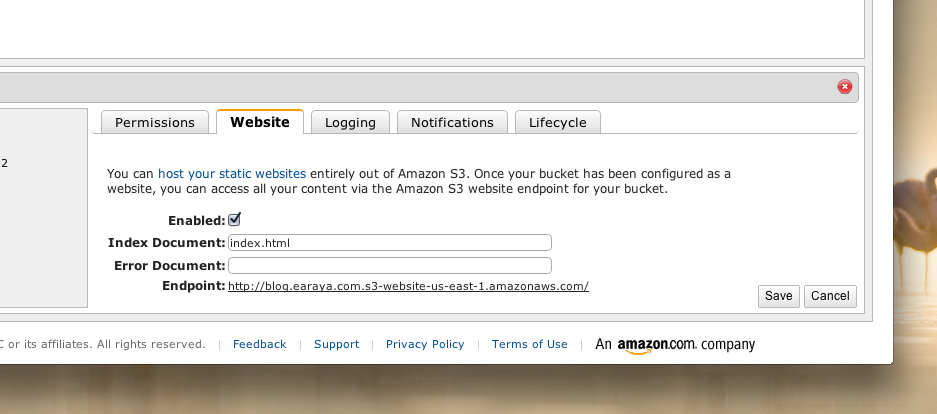
    This is done by clicking the “Properties” button for your bucket (up on the right hand corner) and then clicking on the “Website” tab. You’ll then just have to check the “Enabled” checkbox, and choose your Index and Error Documents.

    S3 Static Website Settings

    This step allows you to create an HTTP endpoint through which your assets can be accessed. It’s important to note this endpoint as we’ll be using it later to setup CloudFront.

  3. Setup a bucket policy allowing the “GetObject” action to anonymous users. You’ll want to make sure you do this at the bucket level so you don’t have to set ACLs for every new file you upload.

Again, this is done by clicking on the “Properties” button, then on the “Permissions” tab, and then adding the following bucket policy:

1
2
3
4
5
6
7
8
9
10
11
12
13
14
15
{
  "Version": "2008-10-17",
  "Id": "Policy1342052196146",
  "Statement": [
      {
          "Sid": "Stmt1342052192499",
          "Effect": "Allow",
          "Principal": {
              "AWS": "*"
          },
          "Action": "s3:GetObject",
          "Resource": "arn:aws:s3:::YOURBUCKETNAMEHERE/*"
      }
  ]
}

It’s important not to miss this step as you’ll get an “AccessDenied” error on your documents if try to browse the website endpoint.

That’s it as far as S3 goes. You’re now ready to setup CloudFront.

CloudFront

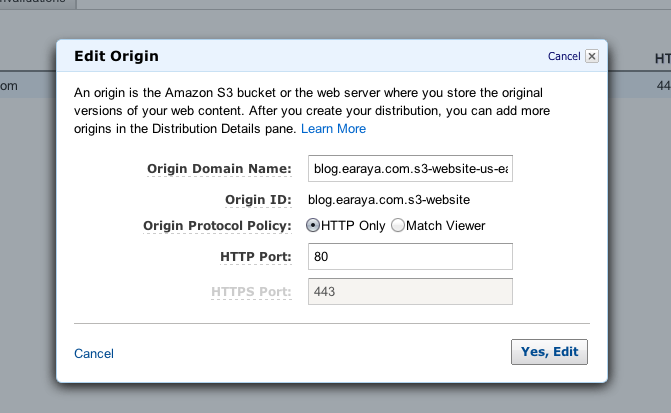
The only thing worth noting here is that while you’re going through the wizard that creates your distribution, you DO NOT want to use your S3 bucket as your “Origin Domain Name”. Rather, you want to use the “Endpoint” URL you got while setting up S3 as described in Step 2 above.

CF Origin Settings

When you’re done with the wizard, note the domain name for your CloudFront distribution. You’ll need it to setup DNS.

DNS (Route 53)

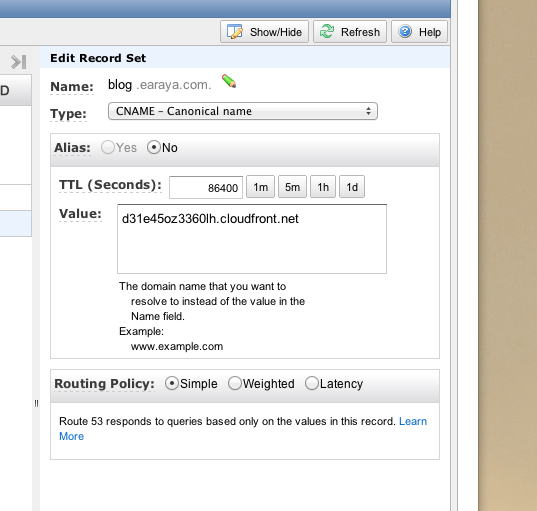
DNS Settings

Add a CNAME, and point it to the domain name of your CloudFront distribution. This blog, for example, points “blog.earaya.com” to d31e45oz3360lh.cloudfront.net (which is what I got when I finished setting up my CF distribution as described above).

You don’t necessarily have to setup DNS on AWS; your domain name registrar can likely add a CNAME record and point it to the CloudFront URL as well.

I mostly ended up using Route53 because I felt like trying it out. Your registrar probably has decent DNS service, so you could just use that instead.

Performance Tips

S3, being just a store, won’t compress files for you. If you want to serve compressed content (which you should), you’ll have to jump through quite a few hoops to get that working. Look at the “Serving Compressed Files From Amazon S3” in this guide here.

Also, S3 won’t set any caching headers by default. You’ll have to make sure you set the appropriate headers manually on each file you want cached. The good news is that although setting this up is tedious, CloudFront will respect your caching headers and evict content appropirately.

Summary

Hopefully you’ve gotten a good idea of how to setup your static site on S3 and CloudFront. It’s really not hard to do at all.

Considering, however, that you can get a micro linux instance for free on EC2, I’d say it’s worth exploring using a good web server to serve your content instead of using S3. That way, you could get caching and compression for free.

Hello World

I’ve started a new blog, and this is it.

I feel like my old blog just didn’t fit me anymore; I certainly don’t feel like I’m “a dotnet dude” anymore.

I’ve also been itching to build a blog just out of static files, host them on S3 and serve them through CloudFront. So I finally bit the bullet and got it all done; I’ll be writing a bit about how to host your own Octopress blog on S3 later.

One last thing: I’d like to thank Erik Zaadi for his awesome Solarized Octopress Theme; it’s a great theme, don’t you think?